注:本人的运行环境:macOS-10.13.4, Python-3.6, Tensorflow-1.4.1
参数保存
训练好的网络,以后要拿来用,自然要保存。否则每次都得20多分钟训练后出结果,多麻烦啊,而且说不定准确率还低,这里说明一下参数保存的事情。
在上一节的代码中,首先我们加一个标签has_trained,表示是否训练过,不想再训练直接调用参数,就设置为True,想重新训练参数,就设置为False。
has_trained = True # or False
然后我们要定义一个保存器,用来保存我们的参数:
saver = tf.train.Saver([weight1, weight2, weight3, weight4, weight5, bias1, bias2, bias3, bias4, bias5])
因为w1-w5, b1-b5全是参数,所以放进这个列表里,说明我们要保存这些参数。
然后,看看我们之前的训练代码:
for step in range(max_steps):
	start_time = time.time()
	image_batch, label_batch = sess.run([images_train, labels_train])
	_, loss_value = sess.run([train_op, real_loss], feed_dict={image_holder:image_batch, label_holder:label_batch})
	duration = time.time() - start_time
	if step%10 == 0:
		examples_per_sec = batch_size / duration
		sec_per_batch = float(duration)
		format_str = ('Step %d, loss = %.2f (%.1f examples/sec; %.3f sec/batch)')
		print(format_str%(step, loss_value, examples_per_sec, sec_per_batch))
这个时候,我们要通过之前的标签,去判断,现在是否进入训练?,是的话,那么一边训练,一边要保存参数。否的话,那么不进入训练,直接调用保存的参数,所以,我们把上面的代码改为下面:
if has_trained == False:
	for step in range(max_steps):
		start_time = time.time()
		image_batch, label_batch = sess.run([images_train, labels_train])
		_, loss_value = sess.run([train_op, real_loss], feed_dict={image_holder:image_batch, label_holder:label_batch})
		duration = time.time() - start_time
		if step%10 == 0:
			examples_per_sec = batch_size / duration
			sec_per_batch = float(duration)
			format_str = ('Step %d, loss = %.2f (%.1f examples/sec; %.3f sec/batch)')
			saver.save(sess=sess, save_path='./ckpt/cifar10.ckpt', global_step=step)
			print(format_str%(step, loss_value, examples_per_sec, sec_per_batch))

else:
	saver.restore(sess, tf.train.latest_checkpoint('./ckpt'))
可以看到,一共只有三处改动,第一处加了if和else,第二处在print上一行,加了一个saver.save,第三处在else后面saver.restore。
然后将has_trained调为False,运行一遍,目录下出来一个ckpt文件夹,这就是训练好的参数,然后再调为True,会发现速度快了不少,准确率和刚刚一样,因为是直接调用的参数。
其他说明
在http://cs231n.github.io/convolutional-networks/上,我们可以看到官方给了如下的网络结构:
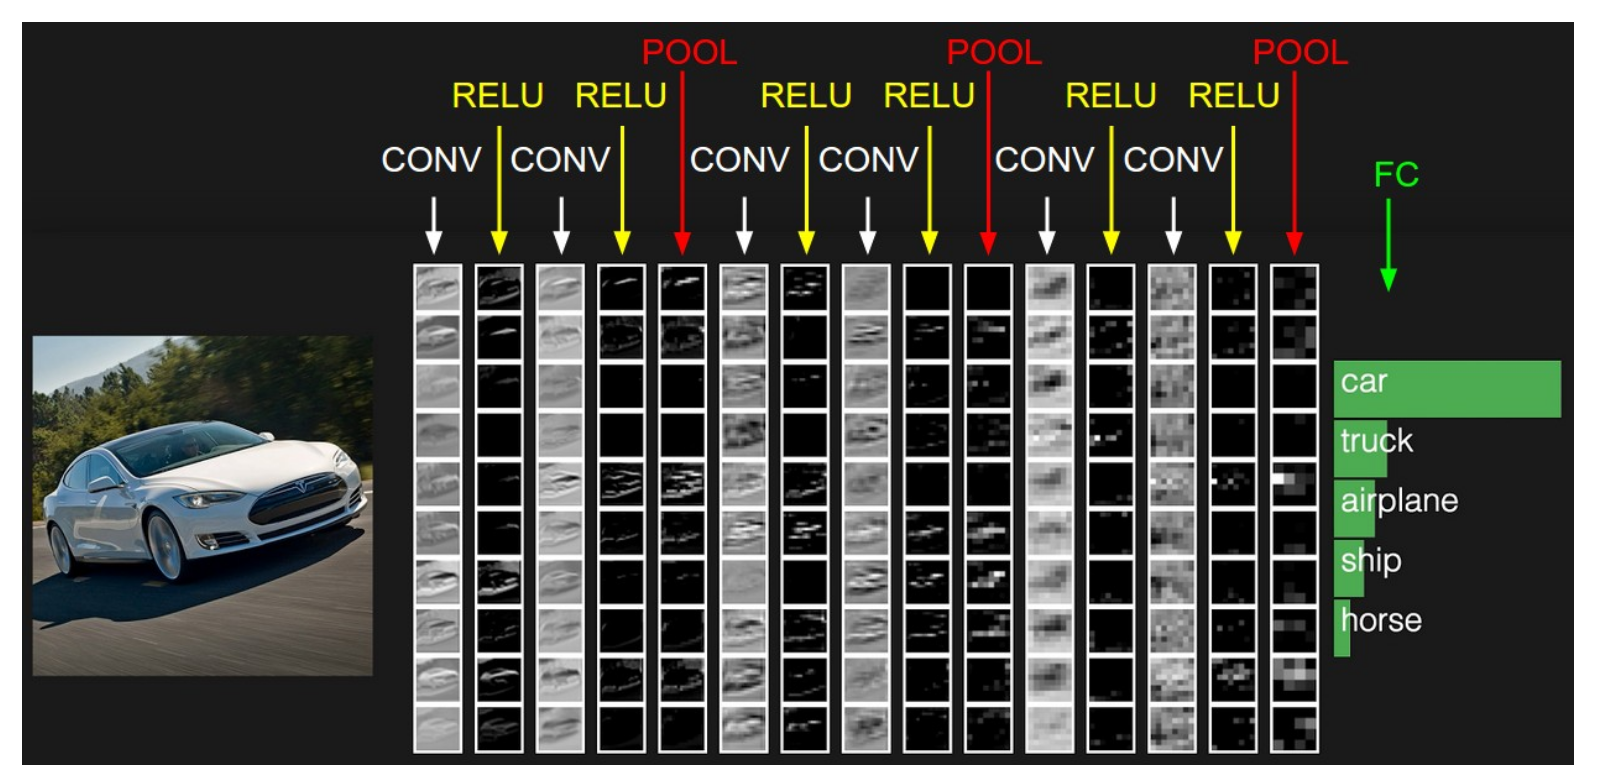
它的过程就是32323的图片:
Step1: 第一次conv得到高阶特征,ReLU激活
Step2: 第二次conv继续得到高阶特征,ReLU激活
Step3: 池化一下,变成1616x的图片
Step4: 第三次conv得到较高阶特征,ReLU激活
Step5: 第四次conv得到较高阶特征,ReLU激活
Step6: 池化一下,变成88x的图片
Step7: 第五次conv得到低阶特征,ReLU激活
Step8: 第六次conv得到低阶特征,ReLU激活
Step9: 池化一下,变成44x的图片(我咋感觉搞这么小真的好么
Step10: 全连接层输出
这个效果怎么样我还没试过,看在线的演示,感觉还行吧,为什么我训练的这个准确率还是低呢。。唔,(捂脸),训练次数不够吧,听说增大训练次数用SGD训练效果很好,能达到86%。
那么最后我们来总结一下吧,卷积就结束了,不继续搞了,不然RNN,LSTM,迁移,强化就讲不完了。
总结
卷积神经网络核心: 卷积层
卷积神经网络输入:图片,或者其他类似的数据
卷积层核心:卷积核,ReLU激励函数,池化,也许还有LRN
卷积神经网络输出:全连接层softmax连接x个识别标签或者别的好的激励函数
卷积核作用:提取特征,前面几层提取的是高阶特征,后面几层就差不多是低阶了
ReLU作用:线性修正,计算方便快速而且没有梯度消失,能抑制某些节点不让所有的激活也就抑制了过拟合
池化作用:降维,和采样差不多,比如1010的降维到55类似,为了降低特征维度
全连接层作用:就是现在有了基础的特征了,那不就可以分类了,全连接层就是分类用的
做一个项目的过程:
- 你得搜集数据,有训练集,测试集,标签
- 你得把神经网络的输入口子看住,类型的什么的搞明白
- 你得搭建一个网络的结构,有多少层,每层有哪些参数,参数什么结构,每层放些啥,怎么激活,怎么池化
- 你得把神经网络的输出口子看住,看怎么分类或者识别,有多少类
- 你得把loss和optimizer给搞清楚怎么降低loss,用什么optimizer好
- 你得定义好训练过程,训练多少次,分多少步,保不保存参数
- 最后测试准确率或者做成一个识别函数直接拿来用
总之,大体过程如上,哪里出了问题自己参考着看看。
那么卷积就完结撒花了~
附,Cifar10识别总代码:
import cifar10, cifar10_input
import tensorflow as tf
import numpy as np
import time
max_steps = 1000
batch_size = 128
data_dir = '/tmp/cifar10_data/cifar-10-batches-bin'
has_trained = False

# Download and Extract
cifar10.maybe_download_and_extract()
images_train, labels_train = cifar10_input.distorted_inputs(data_dir, batch_size=batch_size)
images_test, labels_test = cifar10_input.inputs(eval_data=True, data_dir=data_dir, batch_size=batch_size)


image_holder = tf.placeholder(tf.float32, [batch_size, 24, 24, 3])
label_holder = tf.placeholder(tf.int32, [batch_size])


def variable_with_weight_loss(shape, stddev, wl):
	var = tf.Variable(tf.truncated_normal(shape, stddev=stddev))
	if wl is not None:
		weight_loss = tf.multiply(tf.nn.l2_loss(var), wl, name='weight_loss')
		tf.add_to_collection('losses', weight_loss)
	return var


# 5*5*3的卷积核,64个,第一个卷积层不正则
weight1 = variable_with_weight_loss(shape=[5, 5, 3, 64], stddev=5e-2, wl=0.0)
# 卷积运算
kernel1 = tf.nn.conv2d(image_holder, weight1, [1, 1, 1, 1], padding="SAME")
# bias
bias1 = tf.Variable(tf.constant(0.0, shape=[64]))
# 第一层的表达式
conv1 = tf.nn.relu(tf.nn.bias_add(kernel1, bias1))
# 尺寸3*3,步长2*2最大池化进行池化,尺寸和步数不一样,增加数据丰富性
pool1 = tf.nn.max_pool(conv1, ksize=[1, 3, 3, 1], strides=[1, 2, 2, 1], padding="SAME")
# LRN对活跃的特征放大,不活跃的进行移植,增加模型泛化能力
norm1 = tf.nn.lrn(pool1, 4, bias=1.0, alpha=0.001/9.0, beta=0.75)


# 上一步提取了64个特征,现在输入5*5*64,不需要l2正则
weight2 = variable_with_weight_loss(shape=[5, 5, 64, 64], stddev=5e-2, wl=0.0)
kernel2 = tf.nn.conv2d(norm1, weight2, [1, 1, 1, 1], padding="SAME")
bias2 = tf.Variable(tf.constant(0.1, shape=[64]))
conv2 = tf.nn.relu(tf.nn.bias_add(kernel2, bias2))
norm2 = tf.nn.lrn(conv2, bias=1.0, alpha= 0.001/9.0, beta=0.75)
pool2 = tf.nn.max_pool(norm2, ksize=[1, 3, 3, 1], strides=[1, 2, 2, 1], padding='SAME')


# 这里要对pool2进行拉长成一个向量
reshape = tf.reshape(pool2, [batch_size, -1])
dim = reshape.get_shape()[1].value
# 全连接层特别容易过拟合!一定要加l2正则
weight3 = variable_with_weight_loss(shape=[dim,384], stddev=0.04, wl=0.004)
bias3 = tf.Variable(tf.constant(0.1, shape=[384]))
local3 = tf.nn.relu(tf.matmul(reshape, weight3) + bias3)


weight4 = variable_with_weight_loss(shape=[384, 192], stddev=0.04, wl=0.004)
bias4 = tf.Variable(tf.constant(0.1, shape=[192]))
local4 = tf.nn.relu(tf.matmul(local3, weight4) + bias4)


weight5 = variable_with_weight_loss(shape=[192, 10], stddev=1/192, wl=0.004)
bias5 = tf.Variable(tf.constant(0.0, shape=[10]))
# 这里没有加激励函数, softmax在计算loss的时候加
logits = tf.add(tf.matmul(local4, weight5), bias5)


def loss(logits, labels):
	labels = tf.cast(labels, tf.int64)
	cross_entropy = tf.nn.sparse_softmax_cross_entropy_with_logits(logits=logits, labels=labels, name='cross_entropy_per_examples')
	cross_entropy_mean = tf.reduce_mean(cross_entropy, name='cross_entropy')
	tf.add_to_collection('losses', cross_entropy_mean)

	return tf.add_n(tf.get_collection('losses'), name='total_loss')


real_loss = loss(logits, label_holder)
train_op = tf.train.AdamOptimizer(1e-3).minimize(real_loss)
top_k_op = tf.nn.in_top_k(logits, label_holder, 1)

sess = tf.InteractiveSession()
tf.global_variables_initializer().run()
# 线程队列,16个线程来加速
tf.train.start_queue_runners()

saver = tf.train.Saver([weight1, weight2, weight3, weight4, weight5, bias1, bias2, bias3, bias4, bias5])

if has_trained == False:
	for step in range(max_steps):
		start_time = time.time()
		image_batch, label_batch = sess.run([images_train, labels_train])
		_, loss_value = sess.run([train_op, real_loss], feed_dict={image_holder:image_batch, label_holder:label_batch})
		duration = time.time() - start_time
		if step%10 == 0:
			examples_per_sec = batch_size / duration
			sec_per_batch = float(duration)
			format_str = ('Step %d, loss = %.2f (%.1f examples/sec; %.3f sec/batch)')
			saver.save(sess=sess, save_path='./ckpt/cifar10.ckpt', global_step=step)
			print(format_str%(step, loss_value, examples_per_sec, sec_per_batch))

else:
	saver.restore(sess, tf.train.latest_checkpoint('./ckpt'))

num_examples = 10000
import math
num_iter = int(math.ceil(num_examples / batch_size))
true_count = 0
total_sample_count = num_iter * batch_size
step = 0
while step < num_iter:
	image_batch, label_batch = sess.run([images_test, labels_test])
	predictions = sess.run([top_k_op], feed_dict={image_holder:image_batch, label_holder: label_batch})
	true_count += np.sum(predictions)
	step += 1
precision = true_count / total_sample_count
print('precision: ', precision)